Menu
| File | > | System Setup | > | Application Users | > | Division |
Mandatory Prerequisites
Prior to creating a Division, refer to the following Topics:
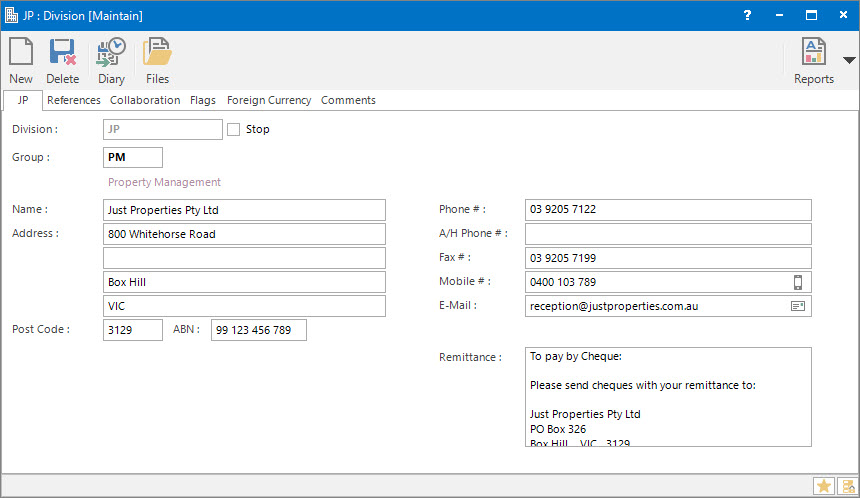
Screenshot and Field Descriptions: Division Tab
Division: this is the primary identifier for the Division.
Stop: this check box determines whether or not a ”Stop” has been put on the Division. By ticking this check box, the Division will be made unavailable to Users attempting to login.
Name: this is the friendly name given to the Division. Examples might be the name of the government department using the software, eg. ”Department of Property Management", or the name of the company, eg. "Property Management Pty Ltd", or maybe the name of the state or territory that the contained properties belong to, eg. "Queensland properties".
Address / Post Code: the Address and Post Code fields should be populated with the appropriate department or company address information.
ABN: this field should contain the ABN for the department or company. This information is used on a number of reports that require display of this information, eg. Tax Invoices sent to tenants.
Phone #: this is the telephone number.
A/H Phone #: this is the after hours telephone number.
Fax #: this is the fax number.
Mobile #: this is a mobile telephone number.
E-Mail: this is the E-Mail address.
Remittance: the text added to this field will appear in the "Remittance" section on some standard reports, such as the Tax Invoice and Credit Note. This field usually contains payment information such as bank EFT information or where cheques can be sent to.
Screenshot and Field Descriptions: Flags Tab

Audit Database: checking this box means that general changes to the system, eg. updating Lease information, adding a new User, deleting a Diary entry, running a report etc. are recorded in the audit log.
Audit Transactions: checking this box means that the adding, changing or deleting of transactions will be recorded in the audit log.
Audit Auto-Transactions: checking this box means that processes that perform bulk transaction creations, eg. running the Lease a/c Charges, will record the operation in the audit log.
Audit Log-On/Off: checking this box will record each time a User logs on or off in the audit log.
Accounting Period - Division: checking this box means that this particular Division will have it's own set of Accounting Periods, as opposed to sharing a global set of Accounting Periods with other Divisions.
GST - Divisional: checking this box means that this particular Division will have it's own table of GST codes, dates and percentages, as opposed to sharing a global set of these settings with other Divisions.
Note: The Divisional settings for Accounting Periods and GST can only be set when a Division is first being created, and cannot be changed later. Your Progenesis representative can assist you in determining the best settings for your business.
Shared or Site Optional Tabs
Other than Tabs described specifically in this Topic, the following may also be available (depending on Site Settings):
How Do I : Search For and Maintain Entities
These General Rules are described in the Fundamentals Manual: How Do I : Search For and Maintain Entities
How Do I : Modify an existing Division
How Do I : Delete an existing Division
Note: A Division record can only be deleted if there are no other records associated with it. An example of an associated record might be a Transaction record, or an Audit entry.
How Do I : Suspend / Reinstate an existing Division
Divisions are associated with the following Topics: